| Table of contents | Previous page | Next page |
Back4Sure is a program for making backup copies of your documents, pictures, music, videos and anything you find valuable. The files to copy may be distributed all over your computer, even on different drives. Back4Sure will gather all the files you've selected for backup and make a copy of them into a specified target directory. The folder with the drive letter of the source drive and the directory structure will be automatically created in the target directory, so all your files will be stored correctly and easy to find. In this process, Back4Sure will only copy files that have changed since the last backup, so even a large number of files is backed up as fast as possible.
You can use a USB flash drive, a second hard drive or a network share as backup target. With the built-in compression of Back4Sure you can save space and especially on flash disks lots of time when you make a backup of thousands of files.
Back4Sure does not use a proprietary file format to store your data. All files are simply copied or alternatively stored in standardized Zip or 7Zip containers. This way you don't need Back4Sure to get your files back, your file manager will do the job!
Additionally, Back4Sure has an option to cleanup the target directory. With this option you can remove orphaned files, that only exist in the target directory but do not have corresponding source files anymore.
While offering lots of options for the backup process, Back4Sure is still handy and flexible: It occupies less than 10 MB of storage space and can easily be run from a flash disk without installation. It does not leave any traces on the host system and does not install any kind of extensions or services.
There are two options for installing the Program: A setup file and a zip file. If you want to install Back4Sure permanently on your computer, please choose the setup file. If you want to copy the program to a flash drive for portable use, you should use the zip file instead.
If you want to use the setup file, execute the file "Back4SureSetup.exe" and follow the instructions of the setup wizard. During installation, files will be copied into your program directory, the file extension ".b4j" will be registered with Back4Sure and optionally a link to the program will be placed on your desktop. No files will be copied into your system directories. After installation, Back4Sure is immediately ready for use.
If you want to copy Back4Sure on a flash drive for portable use, just unzip the file "Back4Sure.zip" to your flash drive. The program can be directly started from the drive now. No changes to your system are made. The file extension ".b4j" is also not registered with Back4Sure, so you'll have to open backup jobs from within the program. Just double clicking the job file will not open Back4Sure. You can still register job files with Back4Sure later in the program options.
After starting the program, you can see the user interface of Back4Sure. The directory tree on the left side shows your local drives and the tabbed options dialog on the right side allows defining the job settings.
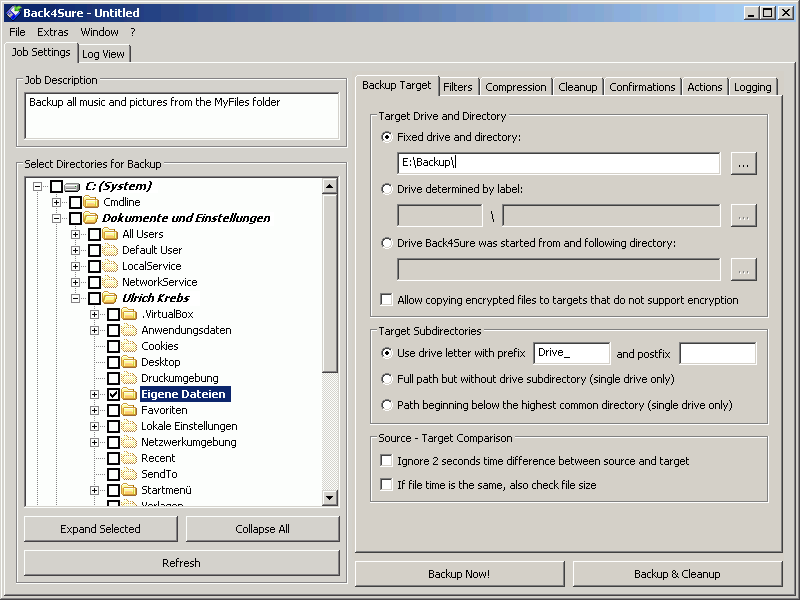
Figure 1.1: Main window of Back4Sure
The directory tree view may differ from what you usually see in your file manager. This is due to the fact, that the directory tree shows the real content of your drive, including all normally hidden directories and without special shortcuts like "My Documents". Don't be irritated, all files and folders are there, but probably not where you normally expect them. The folder "My Documents" e.g. is in fact located under "C:\Documents and Settings\<User Name>\My Documents".
The first step is to choose the directories to backup. For this, put a checkmark in front the directory you want to be included in the backup. Directories selected for backup and all their parent directories will be displayed in bold letters. If you want to include a whole drive into the backup, make sure to exclude the system directory "System Volume Information". This folder may not be accessed with the normal copy method and does not contain regular user data. You should also consider to exclude the "Recycler" directory, as it only contains files that were sent to the recycle bin. You may also exclude certain subdirectories from a selected directory. Just extend the selected folder by clicking the "+" sign in front of it and remove the checkmark of the folder you want to exclude.
The next thing to do, is to specify a backup location on the first tab of the options dialog on the right window side. In most cases the option "Fixed drive and directory" is the best choice. Click on the "..." button and select a directory as the backup target. The default setting "Use drive prefix" under "Target Subdirectories" should be left untouched, as this option will definitely avoid ambiguities when creating the target directories. If you still plan to use one of the other two options, please specify a directory used by this backup only under "Target Drive and Directory"! Do never make backups directly into the root directory of the backup drive, unless you definitely know what this means during a cleanup run! Otherwise the cleanup function may erase files that you want to keep.
All required information for a backup job is now specified. You can now save the job under a meaningful name by choosing "File / Save Job As..." from the menu.
Though not absolutely necessary for successful operation, you may want to adjust other options for the backup job. Especially the filter and compression options may be of interest. The filter options allow a more detailed specification which files should be included in the backup and the compression options allow storing the files into compressed container files ("zip files"). These options are discussed in detail in the full manual and will not be considered here.
After saving the backup job, execution is initiated by pressing the "Backup" button. A progress dialog will appear to inform you about the current status of the backup operation.
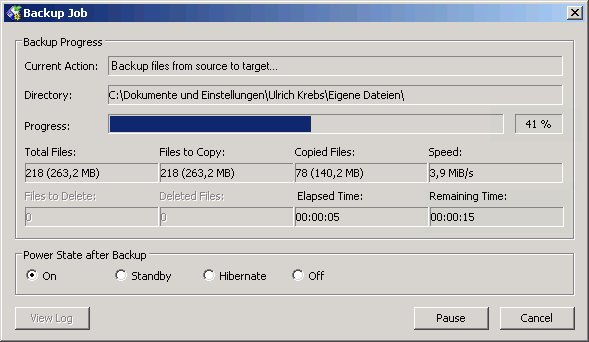
Figure 1.2: Progress of the backup operation
When the backup is finished, you can immediately see in the section "Current action" of the progress dialog, if the backup process was successful. If everything was OK, the display turns green, if there was any error, the display turns red. Backup errors often come from missing access rights or files that are currently locked for processing. To avoid this kind of backup errors, make sure to choose only directories with sufficient access rights for backup and to close all applications that may lock files (mail clients, word processors, etc.).
The reason for a backup error and the affected files can be found in the automatically generated log file. Just press the button "View Log" of the progress dialog. If Windows does not know how to open log files, you'll be prompted to choose an appropriate program for this kind of files. You can use any unicode capable text editor for opening log files, even Notepad will be sufficient. Later on, you can find the log files on the tab "Log Files" of the main window. Just double click an entry there to open the file in your text editor.
Below you can see an example log file of a backup where an error occurred.
*** Job Summary ***
Job name: Test
Job started: 2009-09-13, 22:56:47
Job finished: 2009-09-13, 22:56:47
Elapsed time: 00:00:00
Result code: 1 (There were errors)

*** Backup Summary ***
Total files in backup-set: 38
Total bytes in backup-set: 1038787 (0,99 MiB)
Files to copy: 38
Bytes to copy: 1038787 (0,99 MiB)
Copied files: 37
Copied bytes: 1016319 (0,97 MiB)
Speed: 8,13 MiB/s
Source access errors: 0
Backup errors: 1

*** Source Access Errors ***
No errors occurred

*** Backup Errors ***
Source: C:\Documents and Settings\Ulrich Krebs\Application Data\Mozilla\Firefox\Profiles\cookies.sqlite-journal
Target: E:\Drive_C\Documents and Settings\Ulrich Krebs\Application Data\Mozilla\Firefox\Profiles\cookies.sqlite-journal
Target state: File is outdated
Backup result: 32 (The process cannot access the file because it is being used by another process.)
Obviously, the file cannot be copied because it is locked by another application, in this case Firefox.
It is a good idea to cleanup the target directory every now and then. Due to changed directory structures or file names in the source directories, some files in the target directory become orphaned, i.e. they have no counterpart in the source directory anymore. Back4Sure can delete these orphaned files automatically if you choose "Backup & Cleanup" from the main window. All files in the backup target will be tested for a corresponding source file, then. If there is no such source file, the file in question will be deleted from the backup target.
By default, Back4Sure uses a safe mode when doing the cleanup. In this mode, only files that do not have a counterpart in the source directory will be deleted from the target directory. Files that do not match the backup job and therefore should not exist in the target directory will not be deleted as long as there is a corresponding source file. There are other cleanup modes that do a more exhaustive job, but these options are discussed in detail in the full manual.
| Table of contents | Previous page | Next page |