| Table of contents | Previous page | Next page |
The following chapters will explain how to execute a backup job and to run and control Back4Sure from the command line.
After configuring a backup job as explained in chapter 3, you are now ready to perform the backup operation. If you didn't already saved the backup job, you should do it now giving it a meaningful name. The name of the job is required for creating the log file.
Just click on the "Backup!" button to start the backup operation. You'll see the progress dialog for the running backup, then.
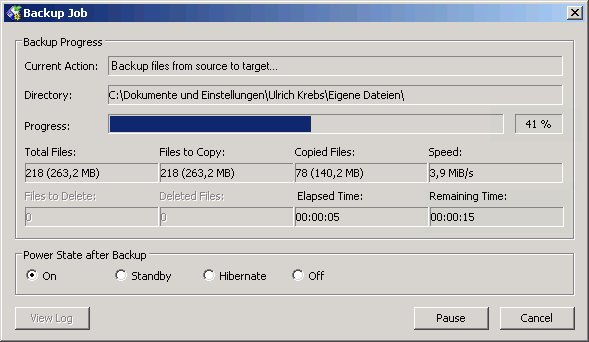
Figure 4.1: Progress dialog for the backup operation
The field "Current Action" shows the currently running stage of the operation. A backup operation is divided into three stages:
During the first two stages the progress bar doesn't move, as Back4Sure first has to know how much files need to be copied. During these stages, the fields "Total Files" and "Files to Copy" will tell you how many files are included in the backup set and how many of them need to be copied. Additionally, the "Directory" field displays the currently processed folder. During stage three, the progress bar will indicate how much of the data is already backed up.
During the whole process, you have the chance to pause or cancel the backup operation using the corresponding buttons at the bottom of the progress dialog. If you press the "Pause" button, the job will be paused immediately. This can be useful if you are about to copy some files to a slow backup media by hand or if you temporarily require to have the full computational power. You can continue the job later by pressing the "Continue" button. By pressing the "Cancel" button you may also abort the whole backup operation.
While the files are backed up, you can instruct Back4Sure to shutdown the computer after backup has finished. For this, activate one of the options under "Power State after Backup". With activating one of the possible options to shutdown the computer, the quiet mode is also enabled, so no further dialogs will appear and the progress display will automatically close after backup. This way the computer will be powered off for sure, at least if there is no action to execute after the backup (see chapter 3.7 for details) that may block the process.
At the end of the backup process, there are two more stages, where Back4Sure will set the access times of the target folders so that they match their respective source folders and finally write a log file for the just finished backup run:
In the last two stages, the progress bar will not move anymore. These stages usually only take a few seconds, with very large backups they may take up to a few minutes.
At the end of the backup operation the progress dialog will show you the overall result of the backup. The current action display will turn green if the backup was successful and red if there was an error.

Figure 4.2: Progress dialog after successful backup
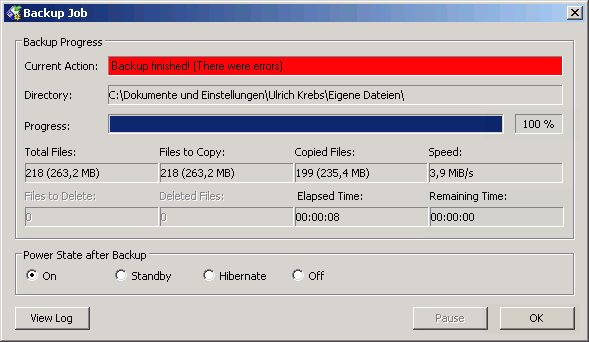
Figure 4.3: Progress dialog after backup failure
Errors during a backup operation are not that rare. Usually only very few files were not copied because they were locked by another program. You can easily see which files were affected if you take a look into the log file. Just press the button "View Log" of the progress dialog. Later on you can find the log files on the tab "Log Files" in the main window. The topmost entry is the log file for the latest executed job. You can open them by double clicking an entry. How to interpret the log file entries is described in chapter 5.2.
If you have worked a lot inside the source directories, e.g. reorganized the directory structure or removed or renamed some folders, it is a good idea to do a cleanup run of Back4Sure. During cleanup, depending on the job settings, all files in the target directory that do not have a corresponding source file or do not match the current backup job will be deleted. This operation will free space on the backup media and will also make it easier to do a restore of relevant files.
Attention! To avoid deletion of possibly required parts of the backup, you should thoroughly read the instructions concerning the cleanup options in chapter 3.5!
The cleanup can only be performed together with a backup run. Just press the button "Backup & Cleanup". The progress dialog will pop up again, going through the formerly mentioned three backup stages. After finishing the backup operation two cleanup stages will follow:
During both stages the currently processed folder is displayed in the "Directory" field. As described in the backup section, the cleanup process can be paused or canceled. At the end of the cleanup run and after setting the folder access times and writing the log file, the overall backup and cleanup result will be displayed in the progress dialog.
All functions for running backups are also available from the command line. This way you can easily schedule backups at regular intervals using the task scheduler of Windows (or UK's Kalender, of course). During command line execution, all interactive functions of Back4Sure can be disabled, so no "Are you sure..." dialogs will interrupt the automated backup run.
There are only very few options for the command line interface. There are command line options, preceded by a "-" sign, and the path to a backup job definition. There is no special ordering of the options or the path, any part of the command line beginning with a "-" will be considered as option and one entry without preceding "-" will be handled as path to the job definition. Make sure to put the path to the job definition into quotation marks, especially if it contains spaces. Otherwise the job definition cannot be found. Below you'll find all available command line options:
| Option | Effect |
|---|---|
| -b | A backup run with the settings of the given job definition file will be performed |
| -c | A clenup run with the settings of the given job definition file will be performed |
| -q | The job will be processed in quiet mode, i.e without any user interaction |
| -x | Back4Sure will automatically terminated after processing the job |
| -m | Back4Sure will run with minimized main window |
| -ps | After backup, the computer will be switched to standby mode. This will also turn on the quiet mode (-q), so the computer is switched off for sure. |
| -ph | After backup, the computer will be hibernated. The quiet mode is also active here. |
| -po | After backup, the computer will be switched off. Quiet mode is also activated automatically. |
All options may be combined as required. For a fully automated job execution, at least the switches "-b", "-q" and "-x" need to be set and of course the path to the job definition file.
A working command line might look like this:
Back4Sure -b -c -q -x "C:\Backup Jobs\FullBackup.b4j"
With this command line, Back4Sure will perform a backup and cleanup as specified in the job definition file "FullBackup.b4j". All tasks will be executed without user interaction and Back4Sure will automatically terminate when finished.
Unlike many other backup programs, Back4Sure does not have an own scheduler for performing automated backups. This is not necessarily a disadvantage, though: Windows already has a quite mighty and highly configurable scheduler on board. Using the task scheduler of Windows you can easily set up a backup job that is automatically executed in regular intervals. Discussing all the possible options for scheduling would fill a book on its own, so only a short introduction to the simplest possible case, i.e. running a backup job in a fixed interval at a specified time, will be given. As there are notable differences between Windows XP and Windows 7/8 they'll be discussed separately here.
In Windows XP, "Scheduled Tasks" can be found in the start menu under "All Programs \ Accessories \ System Tools".
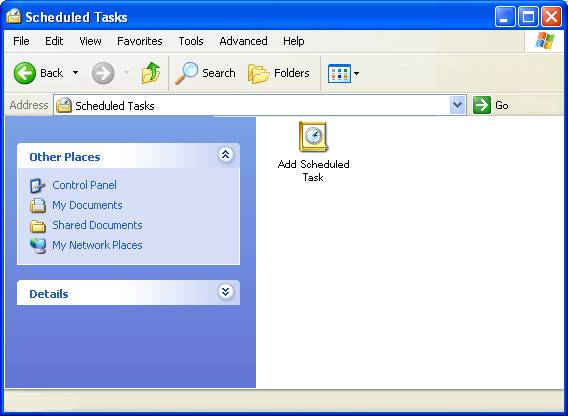
Figure 4.4: Scheduled Tasks in Windows XP
In the Window for scheduled tasks just double click the entry "Add Scheduled Task" to open the "Scheduled Task Wizard".
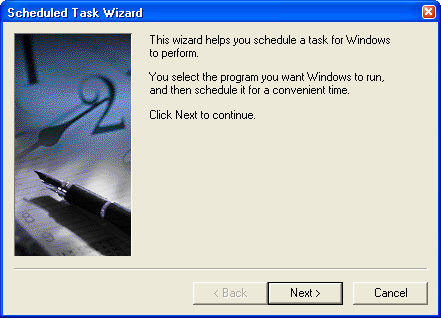
Figure 4.5: Wizard for scheduled tasks
By clicking on the "Next" button, you get a list of all installed programs. If you have installed the setup version of Back4Sure, it will directly appear in this list. If you are using the zipped version, you can browse for the program file using the "Browse" button. On the next wizard page you can give the schedule a meaningful name, e.g "Full Backup" if the job is for backing up all your data. Just below you can specify the interval for executing the backup job. Usually a daily or weekly backup run is a good choice, depending on how often your data changes. On the next page you can refine the options for the execution interval and also specify the start time. As the task needs to be executed under a user account, on the following page an user name and the corresponding password must be entered. Usually you'll enter your own account information. In any case, the account should have enough rights to access the files to backup. On the final page of the wizard you must enable the option to open the advanced properties of the task, as there is still some vital info missing for Back4Sure to successfully execute the backup job. After pressing the "Finish" button, the window for the advanced task properties will appear.
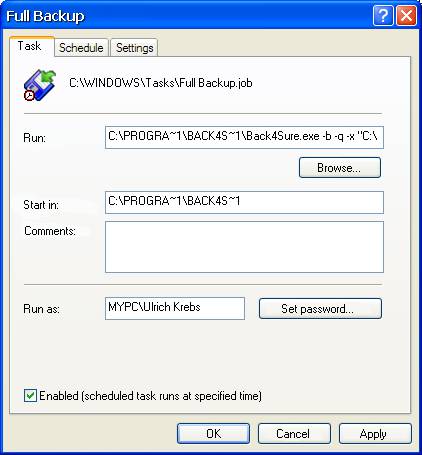
Figure 4.6: Advanced properties of the scheduled task
Under "Run" you'll already find the path to Back4Sure. Don't get irritated by the strange notation, it's a reminiscence of the old DOS times, which seem to be not completely abandoned, yet. In addition to the given path to Back4Sure, the command line options and the path to the backup job must be supplied here. If Back4Sure is installed in "C:\Program Files\", the job file "Full Backup.b4j" in the folder "C:\Backup Jobs\" and you want to make a normal backup without cleanup, the "Run" entry would look like this:
C:\PROGRA~1\BACK4S~1\Back4Sure.exe -b -q -x "C:\Backup Jobs\Full Backup.b4j"
Make sure, you don't forget the quotation marks around the path to the backup job. These quotation marks are absolutely required for the correct execution of the backup job, at least if the path to the backup job contains spaces. As possible options for executing the backup job all settings discussed in chapter 4.3 may be used. For automatic execution it usually makes sense to specify at least the options -b, -q and -x. This will perform a backup operation (-b) without user intervention (-q) and finally close the program (-x).
The configuration of the task is now finished, it will be executed at the specified time in the given interval. You can also change all the settings later on by opening the "Scheduled Tasks" again and double clicking the symbol for the backup task.
Under Windows 7 the task scheduler can be found just like in Windows XP under "All Programs \ Accessories \ System Tools". Alternatively you can also simply type "task" into the edit box "Search programs and files" in the start menu, the task scheduler will immediately appear in the result list.
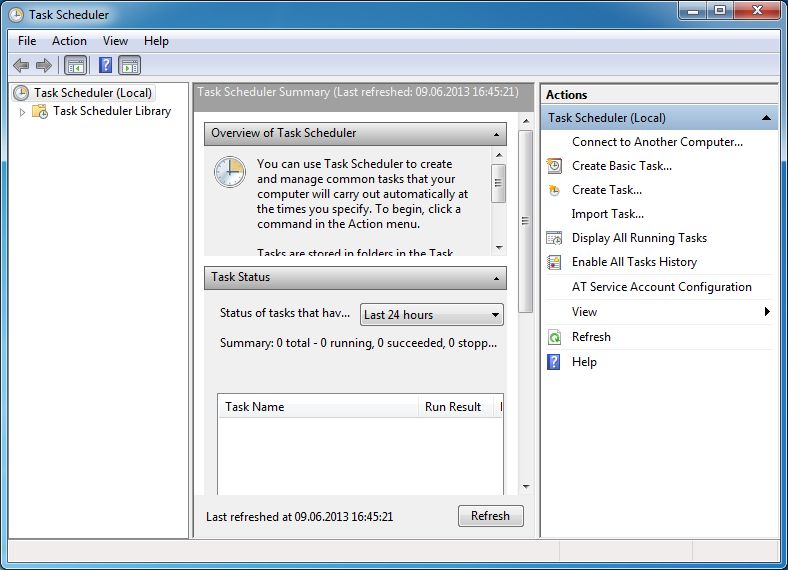
Figure 4.7: Task scheduler under Windows 7
To create a backup task, choose "Create Basic Task..." from the right panel. The "Create Basic Task Wizard" will appear then. On the first page you can enter a meaningful name for the backup, e.g. "Full Backup". On the next page you can specify the recurrence interval for the backup. Usually daily or weekly is a good choice. The next page allows to make some further settings for the start time of the backup. On the following page you must choose "Start a program" as action. If you press the "Next" button, you can browse for Back4Sure as program to start and also enter the required arguments for executing the backup job.
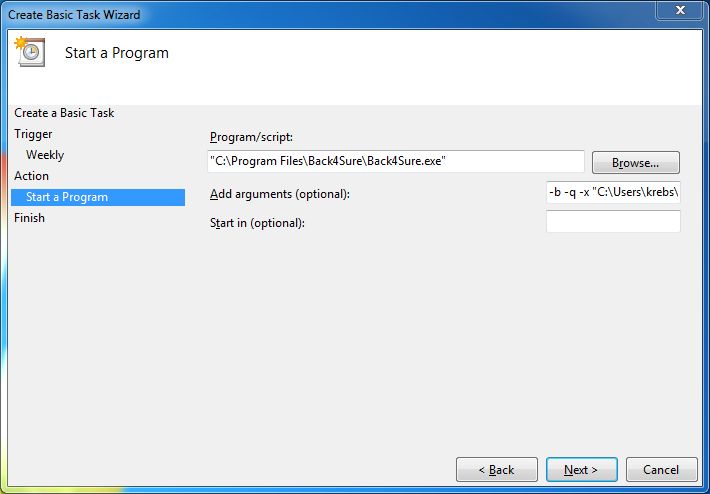
Figure 4.8: Program options for the backup task
Make sure to use quotation marks around every path that contains spaces, otherwise the backup will not be performed. Possible options for performing the backup job are all settings discussed in chapter 4.3. For automatic execution it usually makes sense to specify at least the options -b, -q and -x. This will perform a backup operation (-b) without user intervention (-q) and finally close the program (-x).
To finish scheduling the backup task, just click on "Next" and finally on "Finish". The new backup task appears in the "Task Scheduler Library". To make changes to the backup task you first need to open the "Task Scheduler Library" by clicking on the corresponding entry on the left panel of the task scheduler. In the column in the middle a list of scheduled tasks will appear. The backup task should be stored somewhere inside this list and may be edited by double clicking on it.
Under Windows 8 it is not so very easy to gain access to the task scheduler. A rather easy method is, to enter the word "task" directly into the Metro interface (i.e. not into an edit box). The result list shows one matching entry under "Settings". If you select "Settings" the task scheduler will appear on the left side of the screen. Just click on the task scheduler symbol to switch to the normal desktop and to start configuring your backup task. Fortunately the task scheduler under Windows 8 works just like the one under Windows 7, so I'll only point to the previous chapter 4.4.2 for a detailed description.
| Table of contents | Previous page | Next page |