| Table of contents | Previous page | Next page |
For entering and editing todos, the todo list must be the current view. Double clicking into the free area of the list will bring up the dialog for entering new todos, double clicking an existing entry will open that entry for editing.
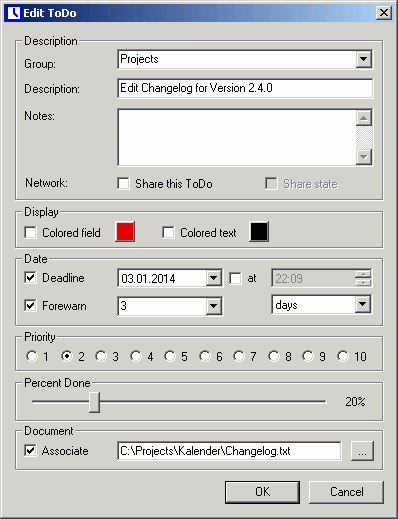
Figure 3.10.1: Enter ToDo
First you should enter a group the todo belongs to, like "Projects", "Phone calls" and so on. You might also choose an existing group from the drop down box. With grouping, you can sort your todos by group or selectively hide or show them.
Now enter a description for the todo and maybe some notes. The option "Share this ToDo" is only available if you have enabled the network support. This can be done under "Extras/Options...". Just like shared events, a shared ToDo will appear on all other todo lists of your network. If you want to not only share the contents of the ToDo but also its state (done or undone), additionally activate the option "Share state".
To color mark the todo entry, enter a background and / or text color in the display section by clicking the color buttons and choosing the desired color.
If the todo is due on a certain date, you might enter it under "Deadline", if necessary also with a time. Just below you can set a forewarn time for the todo. Unlike events you'll get no popup reminder on due todos. Instead, you are reminded of the due todo with a yellow sign if the todo enters the forewarn time and a red sign if the todo reaches the deadline. Additionally the "ToDo" tab and the symbol in the system tray is color marked. You can also assign a priority to the todo, which allows sorting by priority.
If you are working with completion levels, you can enter the percentage of work that is already completed for this todo. This information will be displayed as bar graph in the todo view, so you can see at a glance how much work is left for finishing a todo. If you don't want to use this feature, you can easily exclude this information from display by calling the context menu with a right click on the table header of the todo view and by disabling the corresponding column. The todos can still be marked as done using the state column.
Finally you can associate a document with the todo. This document will not automatically open if the todo reaches it's deadline, but you can easily access the document over the context menu of the todo. Simply right click the todo and select "Execute now". The associated document will open automatically.
| Table of contents | Previous page | Next page |