| Table of contents | Previous page | Next page |
To enter a new event, double click on the day where the event starts. You might double click the colored header of the day or a free line of the event display below. For editing an existing event simply double click the event in the event display. In both cases the dialog for entering and editing events will appear. Here you can specify all event options like start date, end date, description, repetition rate and so on.
All settings will be accepted after pressing the "OK" button. The changes will be immediately reflected in the event view. To undo the changes, you can select "Edit / Undo" from the menu or you can use the corresponding symbol from the toolbar. You can undo any amount of changes this way.
Undone changes can be repeated by selecting "Edit / Redo" from the menu.
In the following the dialog for entering and editing events is described.
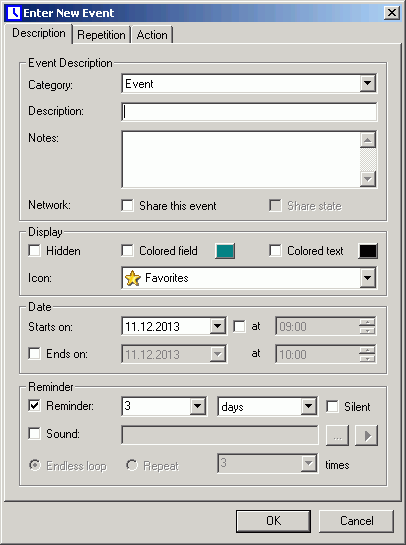
The first visible tab holds the most important settings for an event. Most events will not need further settings.

Figure 3.6.1: Tab "Description"
From the upper drop down box select a category for the new event. If you've not already created some categories, only the default category "Event" is present. Consider creating some categories in this case, as you can make some presets that fit the category, e.g. yearly recurrence for birthdays. Additionally you'll get more options for sorting and filtering events. Instructions for creating and editing categories can be found in chapter 3.8.
When entering a new event, choosing a different category will normally discard all changes made to the settings of the event. If you do not want this to happen, you can hold down the Shift or the Ctrl key while selecting a new category. If you hold down the Shift key, the description and the notes are not overwritten. By holding down the Ctrl key, you are additionally asked for the other event settings to be transferred. This will also happen, if you are changing the category of an already existing event (see chapter 3.6.5 for details).
Enter a short description for the event now. This is the text that will be displayed extra large in the reminder dialog. For the text to fit in the reminder dialog it is recommended to keep it below 40 characters. If you'd like to add extra info for the event, you can add it in the "Notes" field. This text is also shown in the reminder dialog.
The option "Share this event" is only available if you have enabled the network support. This can be done under "Extras/Options...". If you have decided to share this event, it will appear on all other calendars of your network. Normally, only the event data will be synchronized, not the event state, like undone, done or snoozing. This way it is guaranteed that each network participant will receive a reminder. If this doesn't make sense for a certain event, you can configure the event to share its state. If this option is active and one network participant marks the event as done, it will appear as done on all other computers, too. The other participants will not receive further reminders.
Now you can choose how to display the event in the calendar views. Normally, an event is shown without special attributes. Important events might have an icon or are displayed with a special background color and / or colored text. Icons are available from the drop down box. If you cannot find a suitable icon, you can easily extend the library by simply copying additional icons into the "icons" subfolder of your installation of "UK's Kalender". A colored event display can be configured by pressing the color select buttons, the corresponding option for colored text and / or background is set automatically. A color select dialog will appear then for choosing the desired color. Very frequent events you want to be reminded of, but might decrease the clarity of the calendar view, can also be marked as hidden. Those events are by default not visible in the calendar view anymore, but can be viewed by choosing "View / Show Hidden Events" from the menu. They will also appear in the database view available under "Extras / Database...".
Select a start date and a time for the event now. If the event lasts the whole day, you can also choose to disable the start time by unchecking the box preceding the time field. If you'd like to set an end date and time, you can do it just below the start date and time.
If you want to be reminded of the upcoming event, check the box marked "Reminder". Enter the time span you would like to be reminded in advance. It is also possible to enter "0 Minutes" as forewarn time. This way you'll be reminded exactly in time. Additionally you can get an acoustic warning by checking the option "Sound". You'll need to select a sound file in WAV-format for this option to work. The sound file will be played as soon as the reminder dialog appears and repeated in intervals as long as the dialog is open, or, at your option, as often as wanted. The interval for repeating the sound is identical to the interval for the event check that can be entered under "Extras / Options... / Misc" and defaults to 30s.
Another option is the silent reminder, where only a blinking tray-icon reminds you of the due event. For this, additionally to the reminder settings the option "Silent" need to be activated. Now reminders for this event are suppressed until they are explicitly enabled by selecting "Show silent alarms" from the context menu of the tray-icon or the menu "Extras".
If you think this is enough for this event, you can enter it into the calendar by pressing the "OK" button. Special events are handled by the options on the other tabs.
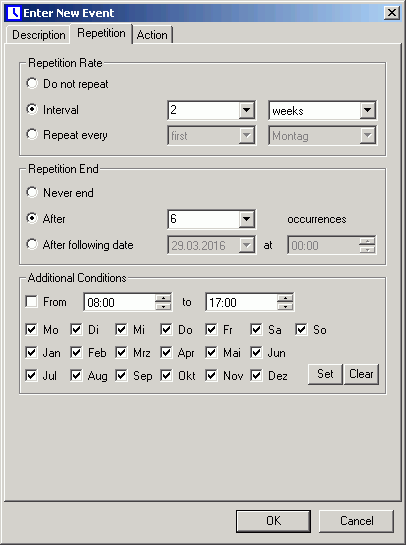
Repetitive tasks are configured in this tab of the dialog.

Figure 3.6.2: Tab "Repetition"
First you need to enter the frequency of the event. You might choose a fixed interval (e.g. every 6 hours, 2 weeks, 1 year...) or a week day of the month (e.g. every 2nd Sunday, every last Monday...).
If you already know when this repetitive event will end, you can specify this also. Enter the number of times this event should be repeated or enter an end date, after that the event stops repeating.
Normally, this information is enough for a repetitive event. For very special cases it might be useful to enter some additional conditions. E.g. if you'd like to be reminded of every Friday, the 13th, simply set the start date to any 13th of a month, set the repetition rate to 1 month and enter Friday as additional condition. For this, remove all checkmarks next to the week days, except the one for Friday.
Another example: If you want to have an hourly reminder on working days between 8:00 AM and 5:00 PM, just set the repetition rate to 1 hour, enable the time range condition and set it to 8:00 AM - 5:00 PM and finally uncheck Saturday and Sunday.
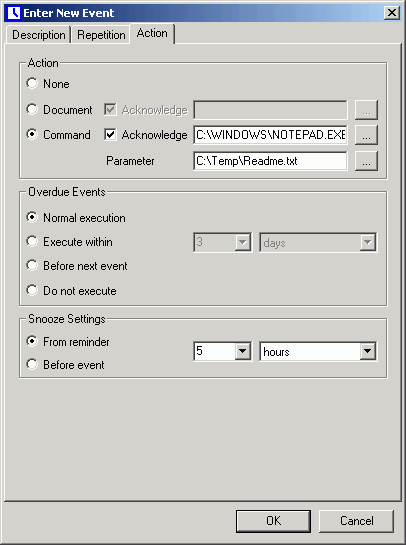
If you want to link a program or a document to this event, you can make the necessary settings here.

Figure 3.6.3: Tab "Action"
First you need to choose if you want to open a document or to execute a command (a program). You can also choose to be asked for an confirmation for opening a document or executing a command. You'll have the choice then, to cancel the execution if it's not appropriate right then. In general it's sufficient to choose either a reminder or a confirmation for this type of events. Choosing a reminder has an advantage over the confirmation as it allows to postpone the execution, while the confirmation only allows to cancel or allow immediate execution.
Choosing the document or program is easily done by selecting it via the "..." button.
In the input fields for the document, the command and the parameter, it is also allowed to use the variables explained in chapter 3.12. This way it is possible to e.g. send yourself an email with the description as subject and the notes as body.
Handling of overdue events is configured in the next section. Usually, events are executed even if they are overdue. Alternatively, you can choose to execute it only within a certain time range, or, with repetitive events, before the next occurrence of the event. Finally you can also tell "UK's Kalender" to simply drop overdue events. This will also work with events without reminder: If normal execution is selected, the event requires to be manually marked as done. With all other settings, the event will auto-complete earlier or later.
In section "Snooze Settings" you can configure a default value for the snooze function of the reminder dialog. If you select a different snooze interval in the reminder dialog, the chosen interval will be accepted as new default value.
"UK's Kalender" allows the execution of internal commands. Internal commands can do things you'll usually do via the user interface. Currently there are three internal commands: !POPUP!, !EXPORT_HTML! and !EXPORT_CSV!. Those commands can be entered right into command field. All required parameters for executing the command are entered into the parameter field.
The command !POPUP! command does not require further parameters. It will restore the calendar window from the system tray when the event is due. This way you can make the calendar popup at a certain time to show you your daily schedule. As it doesn't make too much sense to be reminded of such an event in advance, you should deactivate the reminder option on the "Description" tab and also the acknowledge option on the "Action" tab. You can also mark this event as hidden, so it will not appear among your other events.
The export commands will allow the event driven fully automated export of your schedules. As this usually requires several steps using the user interface, some parameters are required for those commands to work. For the general appearance, all the options available under "Extras / Export Settings / HTML" and "Extras / Export Settings / CSV" are taken into account. Other settings, as the view and the date range are determined by settings entered into the parameter field. The following parameters are valid for both export commands, !EXPORT_HTML! and !EXPORT_CSV!.
-VIEW0
Output is the ToDo list.
-VIEW1
Output is the week view.
-VIEW2
Output is the fortnight view.
-VIEW3
Output is the month view.
-VIEW4
Output is an event list.
-DATEyyyymmdd (yyyy = year, mm = month, dd = day)
This option determines a day that should be included in the view (in week view, fortnight view and month view) or the starting date of a list view (ToDo list or event list). If this parameter is not specified, the event date will be assumed.
-OFFSETn (n = -400..400)
By using the OFFSET parameter you can add an additional offset of n days to the starting date for exporting the events. This can be useful, if you plan to export a list of events starting not exactly from the date of the triggering event but a few days earlier. For this, you'll only have to add the OFFSET parameter together with the desired negative amount of days.
-DAYSn (n = 1..400)
This option is only valid for the ToDo list and the event list and specifies the number of days to export. If this parameter is not specified, 14 days will be assumed.
-FOFF
Disables all filter functions so that all events will appear in the export file, regardless of the current screen display. This is the default setting, if no other filter option is specified.
-FDEF
This option will keep the currently active filter options for export. So the output will be the same as the current screen display.
-FSETs (s = Name of saved filter)
If you have saved a special filter setting (e.g. birthdays) and gave it a name, you can specify this filter to be applied for the export. Just put the name of the filter right after -FSET (without space).
-HOFF
Specifies that hidden events should not appear in the output file. If no other option for hidden events is specified, this is the default setting.
-HDEF
Hidden events will be exported if they are currently visible in the calendar view.
-HON
Hidden events will always be exported, regardless of their current visibility state on the screen.
-FILEs (s = Fully qualified output path for the export file)
With this parameter you determine the directory and file name of the export file. Please make sure that the given path already exists. If the path contains spaces, it is required to put the path into quotation marks. UNC pathes are supported.
Examples
To export all events of the current month except of hidden ones into a HTML file "C:\HTML calendar\events.html", put the command !EXPORT_HTML! into the command field and enter the following options into the parameter field:
-VIEW3 -FOFF -HOFF -FILE"C:\HTML calendar\events.html"
If you have specified a filter named "Birthdays" and you want to export all the birthdays of the next 30 days as a list, enter the following parameters:
-VIEW4 -DAYS30 -FSETBirthdays -HOFF -FILE"C:\HTML calendar\events.html"
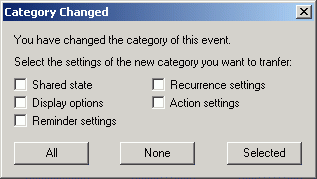
You can assign a new category to an existing event by opening the event for editing and choosing a new category from the upper drop down box. A dialog will appear, asking you which properties of the new category should be transferred to this event.

Usually it's a good idea to apply at least the display options to achieve a consistent appearance for events of one category. Be careful if you choose to apply the recurrence settings. If the event is already recurrent and you have moved or deleted some of the occurrences, assigning new recurrence settings might have unexpected results. If the result does not meet your expectations, you can easily switch back to the old settings by using the undo button.
| Table of contents | Previous page | Next page |